
Have you taken the plunge yet and tried any of the yummy mists you've seen on the craft store shelves? Maybe you've gotten brave and brought some home, but haven't quite figured out how you'll use them, or even worse, you haven't even opened them yet!
I'm here to help de-"mistify" mists. :) I'm by no means an expert when it comes to using mists, but over the past year or so I've figured out a few things that might be helpful to someone just starting out.
What to use:
The mists most commonly used in scrapbooking and paper crafting right now are an ink based shimmery liquid in spray bottles refered to by most scrappers as "glimmer mists". Glimmer Mist by Tattered Angels is the most known mist out there, so the adoption of the name to the medium just seems natural. They offer a huge, ever growing line of colors, with different intensities of color and glimmer. They also have a line of more matte color with sparkle called Chalkboard Mist. Other names in mists are Perfect Pearls Mists by Ranger, and Shimmerz Spritz by Shimmerz. I haven't tried either of these products, but I'm sure most of the techniques I'm about to mention should apply to these. The good news is if you don't have any of these products in your current stash you can also make your own using reinkers and an ultrafine powder like Perfect Pearls by Ranger ( Stay tuned for a tutorial from Kerri).
Where to use:
I know this sounds like a weird subtitle, but mists can be messy. In some ways they are easier to use than paint, with no brushes to clean; but remember the particles are airborne, and sometimes unpredictable. You can use a large box with a cutout front to put your paper inside while misting, this will catch all the overspray. I have also heard of putting a scrap paper in the bottom of the box before starting your project to protect the bottom of the box. After a few projects, the scrap can be removed and used as an interesting background paper.
Call me dangerous, but I don't use a spray box. I have a teflon mat that I work on, that easily wipes clean. The added benefit to the mat is that the overspray pools and beads on it, and I can soak it up with paper creating some fun effects.
Wherever you choose to mist, it's good to know that Glimmer Mist will clean with water when wet, and will most probably wash out of your favorite sweater if you have an oops. That brings me to my next point...
What to spray:
While I've been tempted to give my sweet but annoying cat a spritz or two when he's clawing my leg for attention; these are some of the things that will give the best results:
- WOOD- try thin sheets of wood veneer on your pages, altered objects, or any unfinished wood. A good sealant should be used on anything that will be handled or exposed to moisture.
- PLASTIC- spritz those acrylic shapes and albums that have you so puzzled. The liquid will pool, but will dry and give a stained glass effect.
- METAL AND GLASS- Ive heard Glimmer mist can be used on both, but I haven't tried this one yet.
- TRIMS- customize your ribbons and lace to match any project. Just remember the mist will wash out if these are exposed to water.
- LETTER STICKERS- flat, foam, chipboard- you name it- most alphabets can also be customized with a little spritz.
- FLOWERS- whether you start with white, or an already colored flower, the effects can be dramatic!
- STICKERS AND DIE CUTS- add some sheen to premade stickers and die-cuts to give your own touch.
- PAPER- there are some fun ways to mist your paper, and the outcome will often surprise you!
- CHIPBOARD- My favorite thing to do with my mists is to alter plain chipboard. Darker colors work best on raw chipboard, but if you use white board, you can use any color.
- First rule of spraying: mix, mix, mix-, DO NOT SHAKE! shaking may mix in all the sediment of glimmer at the bottom of the bottle, but it can also cause some of that to lodge in the straw and sprayer and clog it. You can hold the bottle at the top and swirl it around to mix things up, or roll it between your palms. Don't worry if all the glimmer isn't mixed in completely.
- Keep 'em upright: Something I've also recently learned is not to store the bottles horizontally. I was so proud of the drawer full of neatly arranged bottles all lined up on their sides- until I went to use them, and 3/4 were clogged!
- Start spraying off the edge of your project inwards to avoid a hard edge of color.
- Keep your finger on the top of the sprayer, making sure it doesn't curl slightly over the front. this will result in a dirty finger, and a "dribbly" spray.
- Spray quickly and lightly, moving your arm like you were spraying hairspray- this will give a more even coverage.
- Spray short slow bursts for more concentrated "graffiti" type of effect.
- Play around with distance- try spraying close to the paper and further away to see what effect each has.
Curling: not the sport, the paper...
The most common complaint I've heard is about paper curling and buckling. I don't think there is one perfect solution for this. I at times get overzealous, and mist away only to find a wavy mess of paper once it starts drying. My suggestion is to keep the spray light, and let it dry before layering more. I also use a sheet of paper towel, or rag immediately after spraying. I lay it flat on my project and pass my rubber brayer over it to absorb the excess liquid. You can also speed drying using your heatgun.
Sometimes you just need to use lots of liquid, and can't avoid the curling. You can try pressing the paper in an old phone book between some heavy books or ironing your paper on a safe setting ( I would be careful to iron the back, and protect the sole plate of your iron from getting dirty). You can also try misting both sides of your project with water before starting, the thought is that both sides drying will keep the fibers in constant tension and keep the paper straight.
If you find a fool proof way of avoiding paper curl, please share it with us! practicalscrappersideas@gmail.com
Techniques:
pooling: Ive' already mentioned soaking up puddles of overspray to create one effect.
Mask: Use anything from plastic templates, cardstock cutouts, product packaging (negatives), cookie cutters, liquid mask, masking tape, window screen, etc. the possibilities are simply endless.
Simply place the object on your paper, spritz, and remove!
Layering: Try layering different shades to create interest and depth.
Stamping: Use an archival or waterproof ink such as Staz On to stamp an image before spritzing, or use a pigment ink after spritz has dried.
Embossing: Try giving your paper a quick spritz before sending it through your machine in an embossing folder. Not only will it be shimmery, the paper should emboss more deeply and have a crisp look when embossed damp.
Here are a few pages illustrating some of these techniques:

Some of the papers in the above layout were made by stamping and using the pooled ink effect.

Here I sprayed a white chipboard shape with a couple of different colors.

This layout uses a shorter slower spray to give a spottier effect.

The flowers as well as the embossed puppy diecuts were misted in different hues.
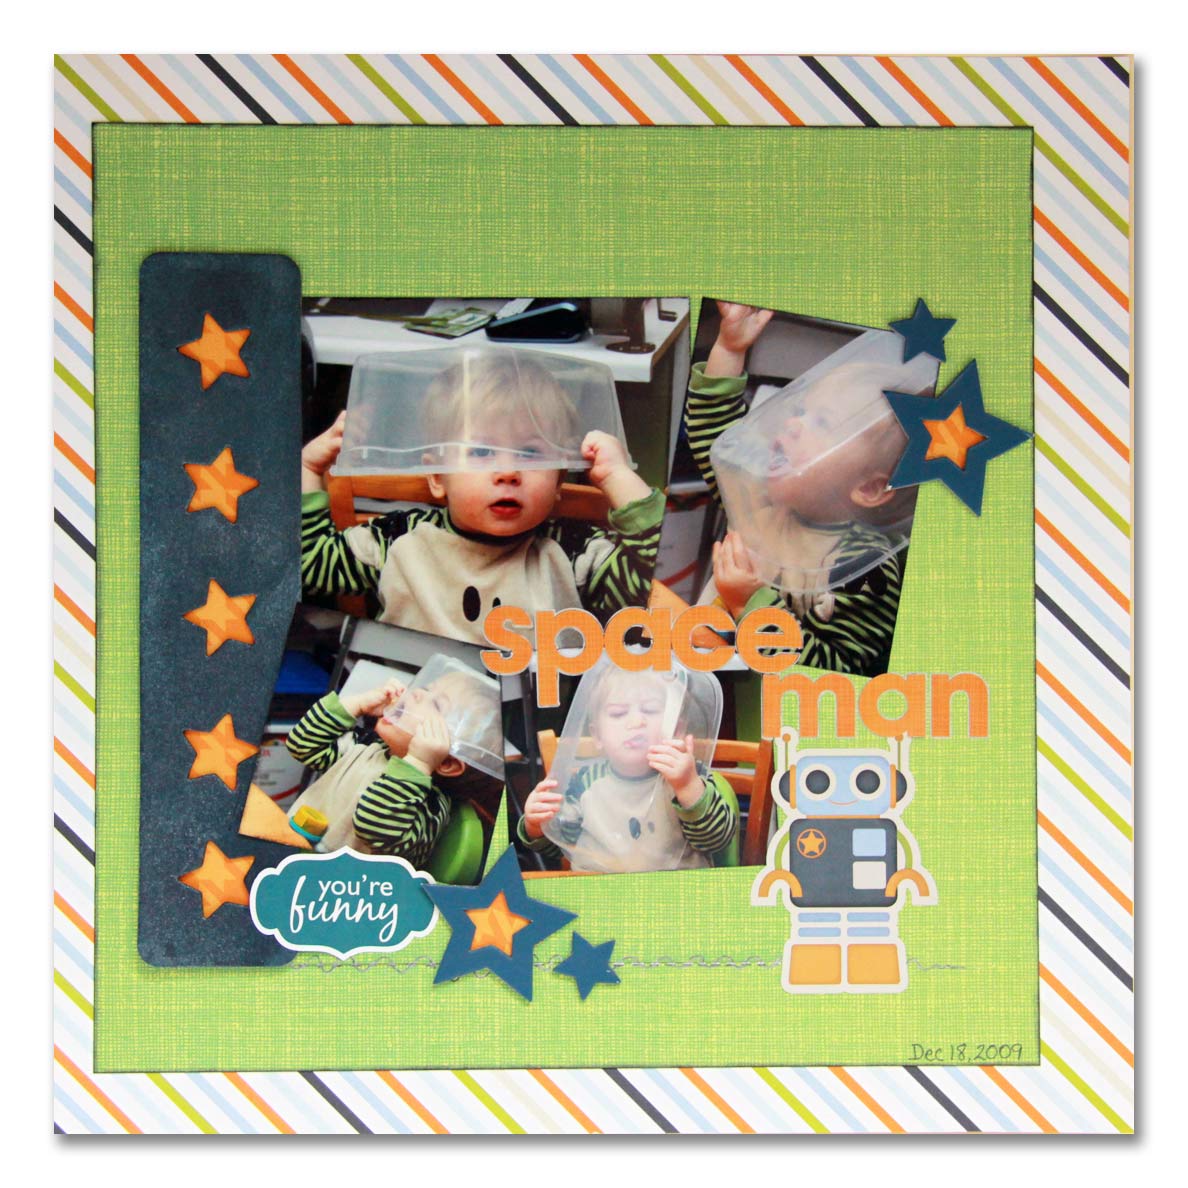
Layered colors of black and blues were sprayed on the raw chipboard on the left to match the rest of the stars on the layout.

The raw chipboard ring here was spritzed and then sprinkled with clear embossing powder before heat embossing to give a pebbled finish.

There are really no limits to what you can do with spray mists once you start experimenting. The important thing is to have fun, and please- as tempting as it may be...do NOT spray the cat! ;)
**Let us know what good things or what not so good things you've done with mists for a chance to win a prize from Tattered Angels! If you haven't tried them yet, tell us what's been keeping you away. We'll draw a winner at random at the end of the month.
18 comments:
The biggest mistake I made with a homemade mist was to leave it in my mister. The pearly paint that I used dried and clogged it all up. :( So be careful!
I honeslty have not tried them yet, I wasn't quite sure what to do with them, you have given some great examples, thanks!!
I make my own mist at home, a combo of Mod Podge, water, and Pearl Ex powder. The savings are RIDICULOUS! I found the mini misters to be the best thing to spray them with, although I also use some travel sized squirt bottles I found at Target. I haven't used any other mist besides my own, as I just haven't been able to part with the money! I can always think of 6 or 7 other things I could get for the price of that one bottle of mist! As a SAHM with 3 kids, I'm always trying to stretch my scrapping dollars.
I have two that I received as a gift; however been afraid to use them because I wasn't quite sure how to use them. You have given some great tips. Thanks!
I Like the product and bought 4 shades (unfortunately can not bay more now). It's so fun to play with it! Here is my first card, made for my daughter. I use a solt over spraied mist to adsorb the warter, then dry with heater. http://asilisamam.blogspot.com/2010/07/blog-post_06.html
It was interesting to learn out that it can be used with other material then paper! Thanks a lot! Will try and share with you!
I don't use a box, just protect the area and place soft paper and old newspaper under sheet I'm going to cover with a mist.
Haven't bought any because not sure if I would use them and not sure how to use them.
craftymom205 at yahoo dot com
I LOVEEEE the pirate page!!!! I like playing with mists and making a mess....makes me feel 5 again :) I have used them on pages and to adde some oooomph to flowers or embellies.....they are hard to find around here tho.....I haven't done the masking effect yet...I really like that!!
I've used mists with masks - small areas - one was a wooden moose that I used as a mask on a travel page. Haven't done an entire page or layers, so no curling paper yet.
I've just recently purchased some mists (Tsukinek Walnut Ink antiquing sprays - the only type I could readily identify as a mist at Michael's) and had some fun spraying a tag for a project. I used letters as a mask, sprayed, then removed the letters to reveal the white underneath. Anyway, my biggest issue is not being able to find the products at my local LSS and I'm leary to order on-line without being able to see the product/colours.
Am eager to try though!
Awesome examples of misting and great info, too!Your Puppy Love LO is so cute! I love Bulldogs! I wish my Bella was still a puppy!
I love using mists! I use them for just about anything. One of my favorite things to do is use the negatives of chipboard cutouts and stickers as masks. Always makes me feel like I'm getting more bang for my buck!
I have tried several times to make my own mists and ended up with just huge messes and clogged sprays!!
The brands available are hard to find locally. I do love the SU shimmer paint mixed with alcohol though and would love to try some of the others.
I belong to a message board where we did a stamped image swap. I recieved an image of a branch/stem with just dots on the top of it. It's a nice image and stamped in black on white cs. I used a purple spray with metallic silver in it that a friend made for me. It added a great touch of color to the image and my card!
I found the card and added a post on my blog here: http://mommaidwf.blogspot.com/2011/01/glimmer-mist.html.
What a wonderful tip post. I have never used glimmer mist but have wanted to. Thank you for sharing your tips and advice with us.
Blessings,
Shawnee
I have used glimmer mist but did not realize what is was and just sprayed and it of course sprayed all over everything. Also my bottles clog easy.
I made some address labels for my nan and stamped on them and gave a light spray of mist, they turned out really pretty and was very easy to do.
I have not tried them yet, I am not sure why, if it is the mess of a spray, or a new technique that scares me away..lol I have always enjoyed seeing what everyone uses them for! So thanks for this very useful and informative post!! I will have to get some and try this now!! The DT projects look great!!!
I like misting - use them to add colour and sheen to naked chipboard. I've also used them with masks/screens. On one layout, I laid the mask down and spritzed with glimmer mist, and then picked up the screen, turned it over and laid it down elsewhere on the cardstock - one spritzing session, 2 looks.
Post a Comment