Showing posts with label embossing. Show all posts

Tuesday, November 5, 2013

A Simple and Not-so- Simple Christmas Card with Video

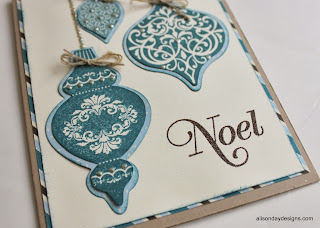
Hi everyone! Practical Scrapper Alison Day here sharing a couple of Christmas cards I whipped up this morning for you. I had intended to create several simple cards but ... I got kind of carried away with one of them and it turned out to be not so simple!!

Ah well, it happens. Right?

I decided to film a video showing you my process on the simpler card as well as giving you an overview of what went into the more complicated card. You can check it out below. Both use supplies I already had on hand - something I am an advocate for. Don't get me wrong, I love to shop for new supplies but re-loving those older supplies is just as important!

Enjoy the video and then scroll down to see close up shots of each card.


Thank you. Hope I've inspired you today!

Thursday, October 3, 2013

It's a Hoot!

Good morning!

This is Practical Scrapper Becci here to share with you this sweet owl themed baby shower banner to share with you this morning. I knew that I wanted to go with fall colors - also very "boy" like orange, and blue. I added a primary color of grey, knowing that the nursery will be grey and blue and owl themed.


When I create a custom banner, I think about the theme of the party or room, the colors that might go with it - usually my own choice of what I feel for the person. I round up the papers and think of the general idea then I set to work. I treat each banner panel as though it is it's own creation. For each of the letters of the baby's name, I cut them out of cream card stock and watercolored each one.

For this banner panel I sewed the punched circles (from the next banner panel over) together into a string and attached them - I love a little banner within a banner.


Here I stamped and embossed a little owl in two of the circles, peeking out.


Here I wove strips of the patterned paper together for the background, and also added dots and star sequins.

Here I used a star stamp (from my 6 year old daughter's craft bin), and I embossed it with white Zing powder.

For this last panel, I wanted to use the EXACT owl as the stamp. So I drew it in Illustrator, imported each part of the owl (eyes, belly, nose) into Silhouette and cut each piece. He's so cute.

And as a bonus, I also made an owl taggie blanket to go with this gift:


For this little guy, I made my own patter for him. the face details are all hand sewn.

Thanks for coming over today to check out my owl-licious creations, it was a hoot!

Tuesday, November 6, 2012

8 Things you can do with Embossing Powder

Digging out embossing powders and inks or glues and heat tools sometimes seems like too much of a hassle for many scrappers.  The results can definitely be worth it though, and embossing powders are one of those cool tools in our caddies that can easily keep up with trends and the times given a little bit of imagination. Here are some examples of the great things you can do with embossing powders:

 1.Add some punch.
Practical Scrapper Leila used embossing powder to cover her chipboard title.

2. Distress it
Practical Scrapper Erin used Piccolo enamel powder and adhesive to cover the raw chipboard kettle. She then used black Distress Ink to make it look like soot from a campfire.
3. Frame it.
Practical Scrapper Charity used embossing powder to decorate the edges of her card in green.


4. Accent it. 
Practical Scrapper Erin used a partial flourish stamp and embossing powder as an accent over the layers of her page.


5. Make a patterned background.
Practical Scrapper Alison used a flourish stamp and black embossing powder on her grey card stock to give it texture and shine.

  6.Use it to resist.
Practical Scrapper Lanette used embossing with her stamps as a resist for the colouring ink.

7. Change up the sticky.
Practical Scrapper Leslii used adhesive squares and cocoa embossing powder to create a design along the bottom (those are adhesive squares!) and to enhance her sentiment.


8. Personalize it.
Practical Scrapper Lanette embossed the year on a foil ornament she made for Christmas.


**Designer projects are not always linked in our posts, but you can always find their blogs in our sidebar or in the staff tab**

Monday, June 25, 2012

1O Things You Can Do with: Embossing Folders


My embossing folders and die cut machine are one of my most used tools.  I love them and love the dimension and texture they add to a project!  Today we have ten ideas for you on different things you can do with the folders besides just embossing.  Several were brand new ideas to me, so I bet you will find some great inspiration!!!
1. Do Crayon Resist
Use a white crayon like Practical Scrapper Erin ( or experiment with other colors) over your embossed paper while it is still in the folder, and then add spray ink or paint for a fun resist effect. ( see details on her blog)

2.  Use it with stamped images
Practical Scrapper Brenda colored a digi stamped image, then cut it out and embossed portions of it, using a woodgrain embossing folder on the branch and a tiny dot embossing folder on the clouds.

3.  Add texture to washi tape.
Practical Scrapper Cathy took her inspiration from side oats and scribbles to layer Washi Tape and emboss for amazing look and texture.  

4. Ink the flat side of your embossing folder then run through embossing machine.
Practical Scrapper Kerri used her Studio g pigment ink (blue) and her VersaMagic red Dew Drop to first ink her embossing folder to create her flag.  She also hand cut her stars then again inked her embossing folder bolder with blue and ran them through to create her star embellishments.

5. Use Acrylic Paint with your folder
Practical Scrapper Donna brushed acrylic paint on the inside of  the embossing folder, then inserted a piece of white cardstock and ran through the Cuttlebug.   Note: Your embossing folder will clean up easily with warm soap and water.  

6. Run thin chipboard thru your machine.
Fresh Face Designer Laura used an embossing folder to add dimension to
 chipboard letters by running raw chipboard through the Cuttlebug and then 
using ink and spray mist to add color and depth to the embossing.  She 
also used the same folder with a Quikutz squeeze tool to emboss 
around the chipboard page "frame".  

7.  Use different folders and solid cardstock to create an interesting background.
 Practical Scrapper Jenny used 3 different embossing folders on 1 project. She used up some coordinating cardstock scraps to go with the selected manu collection.

8.  Apply rub-ons using an empty folder as a layer in your "sandwich stack".
Practical Scrapper Kerri used her Cuttlebug with the following "sandwich stack" ( From bottom up: Plate A, Plate B, Cardstock, rub-on, empty embossing folder, Plate B) to apply her American Crafts "HEAT WAVE" rub-on to some orange glitter cardstock.  She also embossed her orange layer of cardstock to add some texture to her card.

9. Do Embedded Embossing
The technique can be found here with several examples.

1O. Double Emboss
Practical Scrapper Kerri first used a double embossing technique with her Cuttlebug embossing folder (Swiss Dots) and her Nestabilities (Label# 4) to create the double embossed look on the white cardstock. After that, she stamped her saying and images (Studio g stamps) with some yellow pigment ink (Studio g), covered it with clear embossing powder, and added heat with her heat gun to for the embossed look. To learn more about the double embossing technique she used with her Cuttlebug and Nestabilities check out her blog.

Saturday, September 10, 2011

Technique Feature: Double Embossing

Double Embossing or Embossed Embossing is a technique that uses both heat embossing and dry embossing.    I recently ran across this technique and challenged Erin, Kerri, and Aymee to join me in trying it out.  We tried it out in a couple different ways.  


The first way we tried it was to heat emboss first and then dry emboss.
For my card I used silver pigment ink and sprinkled it with black embossing powder.  I then heated the embossing powder and ran it through my cuttlebug machine to get the diamond dry embossed design.  I sanded it a little bit to bring out the silver.   I was going for a classy look and it turned out to look very Halloweeny to me...so I went that direction instead.


Aymee used the same technique but used a clear Versamark pad.  Her color choices really make that cute Momenta sticker pop right off the card.

Kerri played around using different types of cardstock for this technique and found that her two favorites were  Bazzil solid cardstock (since you could actually tell that she  heat embossed over dark green cardstock), and the more subtle Core'dinations color core cardstock for the exact opposite reason (you couldn't tell that she heat embossed over color cardstock).

The second way to do it is to dry emboss first and then heat emboss.  
Erin added Top Boss ink to the raised areas, and then added the embossing powder and heat. This left open areas of paper that she was able to mist and ink. you can't even tell she used a patterned paper underneath!

-Christine

Saturday, June 11, 2011

Technique Feature: Embedded Embossing

We thought it would be fun to do a little technique feature/challenge with y'all.  Embedded embossing is a technique that takes your regular embossing folders a step further.  To do it you adhere all your layers together (this can be stickers, paper, rubons...) and then run it through the machine just like you would with a single layer.  It "embeds" everything together and creates a unique look.  Check out these examples from your technique junkie leaders here at Practical Scrappers...


This is one of 2 bouquets Erin made for her son's preschool teachers. She had originally taken the idea from one of our Friday Fabulous Finds ( See Amy's project here). Since everyone's donations were consolidated to  just one gift card per teacher, I decided to get the kids to each decorate an insert to go  inside the flowers. Each color is embossed with a different folder.

Tuesday, November 23, 2010

Layouts Featuring Embossing Folders

Whether you want to add texture and style to your project or even add some dimension; you embossing folders will get the job done for you. We've features those embossed cards, and even shared some unique ideas and ways to use your Cuttlebug. Now, it's time to showcase some of our favorite layouts that use embossing folders on them.


On these two layouts, Pia uses the same embossing folder, but create a different effect on each. In the first, she embossed a transparency and painted on the backside of the transparency with acrylic pain. In the second one, she embossed some color core cardstock then ligthly sanded the number to make them more visible.

Tuesday, November 16, 2010

Cards Featuring Embossing Folders

We shared with you on Saturday some unique ways to use your Cuttlebug, but now I'd like to share with you my favorite reason for using my Cuttlebug--embossing.

Today, I have the pleasure of sharing with you some fabulous cards using embossing folders by our design team members. Let's get right to it!


Penny chose a mono-chromatic theme and lots of Cuttlebug embossing to create this card. The base layer of the card is embossed with the Cuttlebug folder Paisley, the three panels are embossed in Swiss Dots and the letters are embossed with Paisley again. The outside of the card is dusted with a matching blue chalk. A silver baby rattle is tied by a coordinating blue ribbon. The interior sentiment says joy an is embossed in the same manner. Cricut Cartriges used are George and Winter Woodlands, Papers are also Cricut papers.


Deanne used her Spots and Dots embossing folder to emboss the bottom portion of her card.


Brenda used the Perfectly Paisley Cuttlebug folder to emboss the background on this card, and the Houndstooth Cuttlebug folder to emboss the die cut images on this card.


Kim used her baby embossing folder and some baby pink ink to create this baby girl card. She simply inked the inside of the folder before she embossed the cardstock. She loves the look the paper gets from this technique. Then she finished the card off with a cute ribbon and charm.


Kerri
Here are three of my favorite cards where I've used embossing folders.I tried give you all a little variety ranging from embossing everything on the card (base, layers, and embellies), embossing pattern papers, to embossing the matting to add some dimension and elegance.


Hope you all enjoyed the embossing inspiration! Now that you are all inspired by the embossing, it's time to take that spark and start your own embossing creations, but with layouts. We are currently seeking submissions for layouts that using embossing on them. The deadline to submit is Sunday, November 21, 2010.