
Welcome to our brand new feature "Ten Things Tuesdays." Each week we will present a tool or product and ten ideas of how to use it that are a little out of the box. Hopefully we will get some creative juices going for you on how to use items you've already got in your stash! This week we kick it off with one of my favorite tools: Border Punches!

1. Create tags using a border punch.
Practical Scrapper Christine used a fiskars punch and trimmed between every two scallops to create individual tags (these would be great for journaling strips too!)

1. Create tags using a border punch.
Practical Scrapper Christine used a fiskars punch and trimmed between every two scallops to create individual tags (these would be great for journaling strips too!)


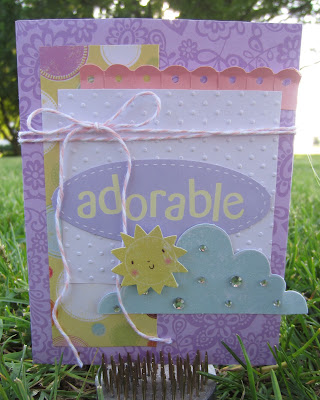
2. Create a layered flower.
Practical Scrapper Kerri
used her corner border punch from one of her Martha Stewart combo sets
to create this layered flower. She started by cutting three circles
with her Creativer Memories circles at 2 1/2", 2 1/4" and 2" then
punched around each circle and used some foam pop ups in between each
circle.

3. Make a funky starburst.
Practical Scrapper Erin layered strips of patterned paper, some punched with border punches, and washi tape to create a starbust design (punches by EK Success and Martha Stewart).

Practical Scrapper Jeannie added pearls to the center of her negative circle space. She used an EK Success punch.
Practical Scrapper Christine used her Fiskars punch and changed it up by snipping in between each scallop. She also created dimension by curling the scallops forward.

6. Repeat border and layer to create ruffles.
Punch used: Martha Stewart, card by Practical Scrapper Jayma

Practical Scrapper Jeannie used all kinds of border punch techniques on this card be it to create different edges, add dimension, embellish her dress...take a good, long look at this one!

Practical Scrapper Christine used scraps to totally change the look of her punch. This is the same EK Success punch you saw used in Jeannie's card above!

Practical Scrapper Erin took the grid look one step further with her unique squares and she jazzed it up even more adding eyelets to her Fiskars punch holes.

10. Use thread and do some hand stitching to embellish your border.
Practical Scrapper Christine used that EK Success Punch that keeps showing up and did stitching to change up her border.
What are some items/tools you'd like to see featured here? We've got the next month planned but are wide open to what you want beyond that!
-Christine
3 comments:
I would love to see washi tape.
great ideas everyone!!
Super cute! Love all these iddeas..some I have never tried but will! Thanks!
Post a Comment