
You might be asking "What's an A2 card exactly?" A2 is used to refer to what most of us consider the basic size of 4.25 x 5.5 inches folded (or 8.5 x 5.5 inches unfolded). The perfect size for invitations, birthday cards, birth announcements and anything you might wish to send fairly inexpensively by mail. Our team has risen to the challenge this week of taking the basic from boring to brilliant; here are 10 ways to do it:
1. Put in a window.
Out for Publication!
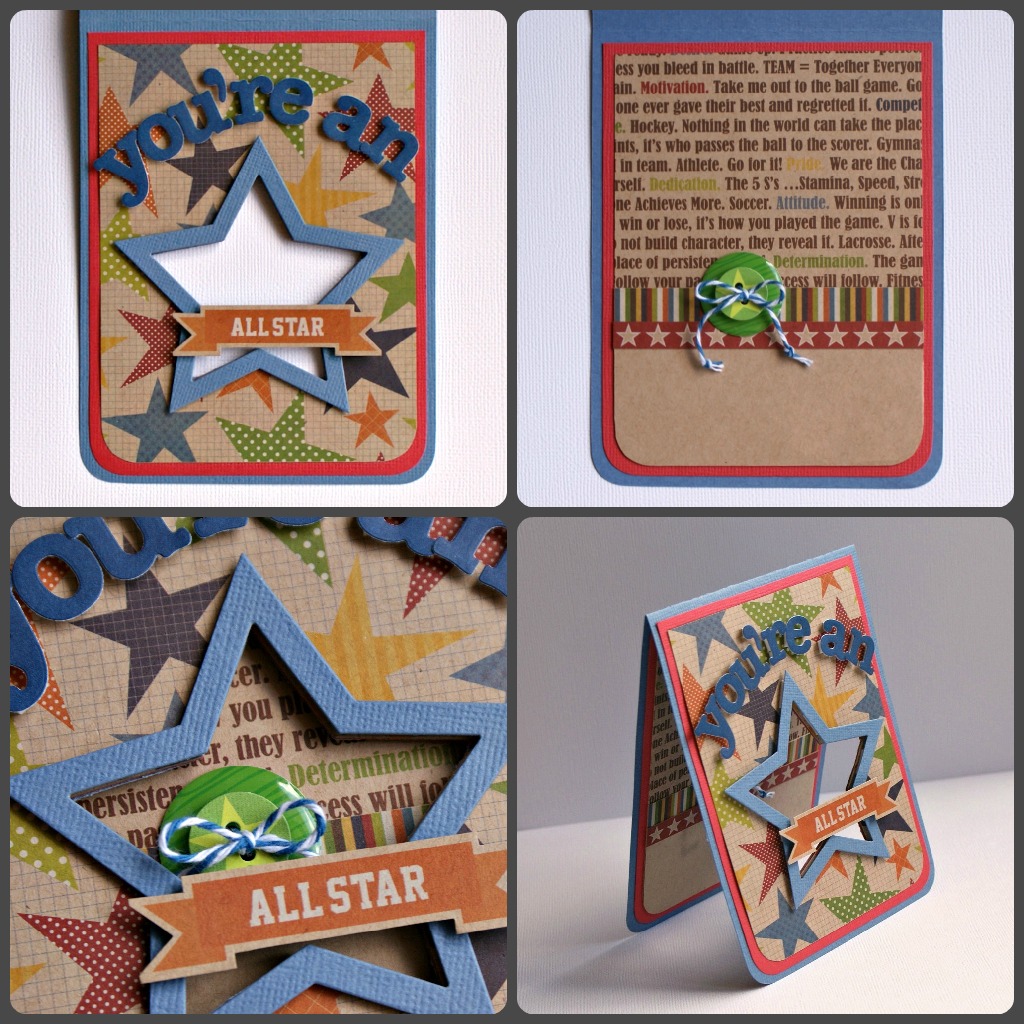
Practical Scrapper Jenny made a window/peek-a-boo card. She used a Sizzix die to cut her star and the larger one to frame the window.


2. Die cut it partially to create a new shape
Practical Scrapper Kerri first cut her card base to standard size for A2 card. She lightly creased where the center fold would be then placed her scalloped circle nestability so that half would be above the fold and half below. She ran through her Cuttlebug only halfway to center fold then unrolled it back out.
3. Create a fun side step card.
Practical Scrapper Ann used a prefolded A2 card and altered instructions found online, to create her card. She used a trimmer to make a lengthwise cut in the card, and then used scoring tools to create the steps. When closed, the card will still slide into a standard envelope.

 4. Make a Z-fold card
Practical Scrapper Jayma scored an A2 card base at 2-1/2" and 4-1/2" to create a Z-fold card. She used only cardstock, with stamps to taking the place of patterned paper.


Practical Scrapper Kerri first cut her card base to standard size for A2 card. She lightly creased where the center fold would be then placed her scalloped circle nestability so that half would be above the fold and half below. She ran through her Cuttlebug only halfway to center fold then unrolled it back out.
3. Create a fun side step card.

Practical Scrapper Ann used a prefolded A2 card and altered instructions found online, to create her card. She used a trimmer to make a lengthwise cut in the card, and then used scoring tools to create the steps. When closed, the card will still slide into a standard envelope.


Practical Scrapper Jayma scored an A2 card base at 2-1/2" and 4-1/2" to create a Z-fold card. She used only cardstock, with stamps to taking the place of patterned paper.

5. Add a new edge
Practical Scrapper Brenda used a border punch on the front of an A2 card, then used a border embossing folder right above the punched edge. She sanded the embossed areas a bit and added some little pearls for the flower centers.

6. Round it out!
Practical Scrapper Brenda rounded the corners on A2 cards to make oval shaped cards, and then added punched or hand cut shapes to make these jack-o-lantern and snowman cards.

7. Make a mini album.
Practical Scrapper Erin glued her pre-made cards shut, and used them to create a fast easy mini album.

8. Add a panel
Practical Scrapper Amy change the usual orientation and added a panel to create an A2 easel card.

9. Mat a photo
Practical Scrapper Erin opened her pre-made cards up, and used them as a base for journaling and her photo.
10. Cut into the cover
Practical Scrapper Christine made her card front into a banner shape by cutting a portion of it away, and revealing a bit of the inside of the card.
4 comments:
wow these are all so amazing tfs.
Fun and inspiring! ... Thanks so much!
Some wonderful ideas! TFS.
Happy to be a new follower of all this delightful talent, tips, techniques and more. Love that side-step card and all the others are divine! Stopping in from the Link Up Party with SVG Sunday Blog!
:O)
Jessica S
Post a Comment