What yo will need to create this:
5 - 12x12 sheets of double sided paper
(if you don't have double sided, glue two coordinating single ones together)
1- 6" Circle of coordinating cardstock for base
Hot glue gun (goes quicker and holds better)
about 40- 4" squares of tulle
5" circle of pattern paper to create center design of wreath
How to create:
Cut two sheets of double sided 12 x12 paper into 4 inch squares ( you will end with 18)
Cut two sheets of 12 12 paper into 3 1/2 inch squares (again end with 18)
Cut 1 sheet of 12 x 12 paper into 3 inch squares ( end with 12)
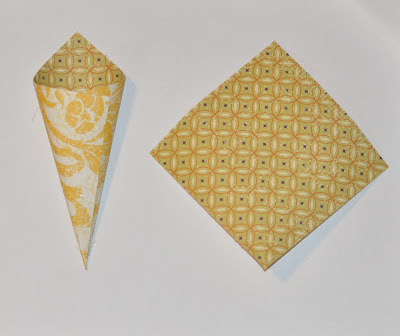
Create cones by holding your squares to so they look like a diamond. Fold in sides (do not crease) overlapping one side over the other ( which ever way you overlap keep it the same throughout so all your cones look uniform) the point will be the bottom...see below photo
Next, after you have all your cones made up you will want to start with your 6" cardstock base circle. Find the center of your circle and with a marker draw a mark at that point (it doesn't matter you won't be able to see it). I then prefer to use my 1" circle punch, punch a circle from a scrap, lay it over my center point and trace it. This is the line I use to put the base of cones on for my bottom layer. Starting with your largest begin to lay them on like this...
(this was just scraps I had laying around to demonstrate how to create)
This layer usually takes about 14-17 cones (depending on how tight you roll them) there is no exact
Repeat with the 3 1/2" squares usually 12-15
then the 3"squares usually 8-12
This will create 12" diameter wreath
Here's an up close view of the center of my wreath you can fill the center however you like, or not fill it at all, which looks great as well!
Here's where the tulle comes into place. I cut 4" squares (not exact) , found the center of the square gathered it up, added a dot of hot glue to the end and stuffed it into my cones. I really like the tulle because it adds another level to it.
Thanks for stopping in today and have a fabulous weekend!


3 comments:
beautiful thanks for showing a how to. hugs
How simple and pretty. Any occasion would be made nicer with this wreath! TFS!
Cool! like that)
Post a Comment