Showing posts with label Sarah. Show all posts

Tuesday, February 26, 2013

10 Things - Transparencies

Today's 10 Things is all about that stuff we can't see, and using it with the stuff we can. Vellum, transparencies and clear embellishments got you stumped? Have a look at these fantastic ideas!

 1. Trap some good stuff. 
Practical Scrapper Charissa stitched a transparency onto her layout to create a pocket for confetti and glitter for a fun and interactive element.


2. Cut it out.
Practical Scrapper Linda used a key cut from a transparency sheet as an embellishment. She also used clear buttons here and there on the layout.


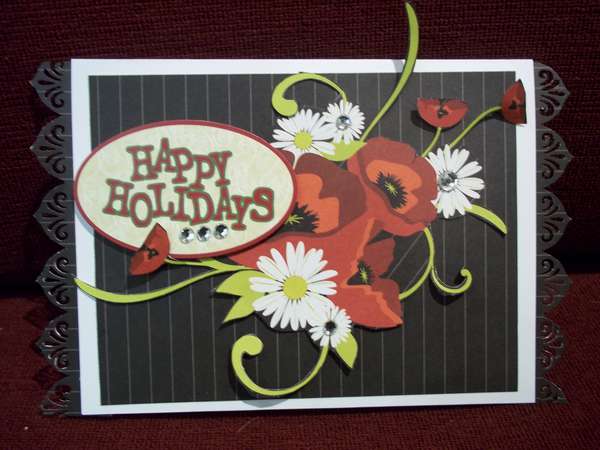
3. Create a false window.
Practical Scrapper Karen used permanent ink to stamp a bracket frame on the transparency and then embossed the flowers for her sophisticated sympathy card.


 4. Die cut it.
Practical Scrapper Lisa die cut her butterfly from transparency using her Cricut. She added some paint strokes to the back of the transparency and layered it on top of  patterned butterflies giving the wings  a textured and glossy look.


5.Colour it.
Practical Scrapper Lanette created a stained glass card using a transparency and gel pens.


6. Make it a base.
Practical Scrapper Sarah used a transparency to create a clear card.  By placing layers on both the inside and the outside of the card, she was able to create a fun, 3D effect on a clean and simple card.


7. Help them fly. Practical Scrapper Kenya used transparency scraps to give the butterflies a floating effect. 


8. Layer it up.
Practical Scrapper Kelly Jean fussy-cut onsies from a Hambly Screen Prints transparency and backed them with patterned paper to create a banner for her card.
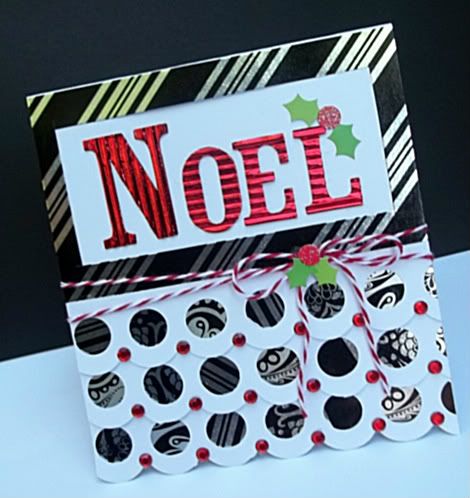


9. Add some shine.
Practical Scrapper Leslii Wagner used clear bottle cap embellishments on each of the outer circles of her hand drawn flower.


10. Stamp it.
Practical Scrapper Erin stamped her butterflies onto vellum using Staz On, and then coloured the reverse side using Copic Markers.


Monday, February 13, 2012

"Love"ly Cards

This week I asked our designers to focus on projects with lots of hearts or about love, a theme that was kicked off by our 5th round of the layout contest (have you voted yet this week?)  Today we're going to share cards with you.


 Practical Scrapper Jayma


Pin It **Designer projects are not always linked in our posts, but you can always find their blogs in our sidebar or in the staff tab**

Monday, November 21, 2011

Christmas Card Inspiration

Today we are bringing you a whole slew of card inspiration from both our designers and our readers - enjoy!
Erin used Momenta papers and Copic markers to detail a  La La Land Crafts digital stamp.

Practical Scrapper Julie


Practical Scrapper Monique

Addie Otto


Practical Scrapper Rachel

Practical Scrapper Fern

Practical Scrapper Aymee is going to send this one to a fellow scrapper so they can disassemble it and use the brads from Creative Charms again!

Practical Scrapper Ann

Images used are from Doodle Pantry (Quirky Kangaroo & Wreath)

Practical Scrapper Dyane


Practical Scrapper Corinna


Pin It **Designer projects are not always linked in our posts, but you can always find their blogs in our sidebar or in the staff tab**

Friday, November 18, 2011

Altered Cookie Cutter Ornaments


Ever wanted to make something really neat for your tree (or someone elses), that is different from the usual decoration?  Well today I'm going to show you how to make altered cookie cutters that you're going  to want to cover your tree in!

Firstly you're going to need a few things:

Some shaped cookie cutters - metal or plastic - I chose a reindeer and Santa himself :)
 You'll also need some patterened paper and co-ordinating ribbon, scissors, a glue gun, adhesive (I used my ATG), pen/pencil and any embellishments you like.
 First up, chose your paper and with the pattern you want to see in the cookie cutter facing up.  Trace around your cookie cutter with your pen/pencil.
 Using your scissors, cut around the drawn shape about 5mm away from the line.  Then snip all around the edge, from the outside edge into the line.
 Once the edge is completely snipped, add adhesive over the top of all the tabs.  I used my ATG gun and just ran it around the entire outer edge.  Sit the paper on the cookie cutter (so that the lines line up with the shape) and press down all the little tabs.  The adhesive will stick to the cutter and stay put.  Do this for the entire cookie cutter.

Take a strip of ribbon and add adhesive.  Again I used my ATG gun.  Then gently line up the ribbon with the edge of the cookie cutter, and over the little tabs created from the paper and press down.  Do this for the entire cookie cutter.

Now you can embellish to your hearts content!

I used chipboard shapes that I frosted in white flocking.  I created some candy canes and added a poinsettia flower.  If you have a Crop-a-dile, you could put a hole in the top of the cutter and thread your ribbon through.  I had to hot glue mine on.

A variation on this idea is to put in a piece of acetate before putting on the backing paper.  You can then fill your cookie cutter with sweets/candy/tiny toys before gifting it.

Pin It **Designer projects are not always linked in our posts, but you can always find their blogs in our sidebar or in the staff tab**

Tuesday, November 15, 2011

Using up Christmas Stash

For today's post Erin challenged the designers to use up some Christmas Stash that we were still holding onto from past years.  Our fabulous designers took that challenge and ran with it! Some even used Christmas stash in a non-Christmas creation!

Practical Scrapper Brenda

Practical Scrapper Christine

Practical Scrapper Audrey

Practical Scrapper Carolina

Practical Scrapper Jayma

Practical Scrapper Ann 

Practical Scrapper Fern

Practical Scrapper Dyane

Practical Scrapper Christa

Practical Scrapper Sarah

Practical Scrapper Kristy


Pin It **Designer projects are not always linked in our posts, but you can always find their blogs in our sidebar or in the staff tab**