Showing posts with label ribbon. Show all posts

Friday, January 10, 2014

Ten Things You Can Do With Ribbon

It has been awhile since we visited the topic of things you can do with ribbon.  Today we are back with ten ideas of ways to make this versatile supply work on your paper crafts!

1. Create Garland
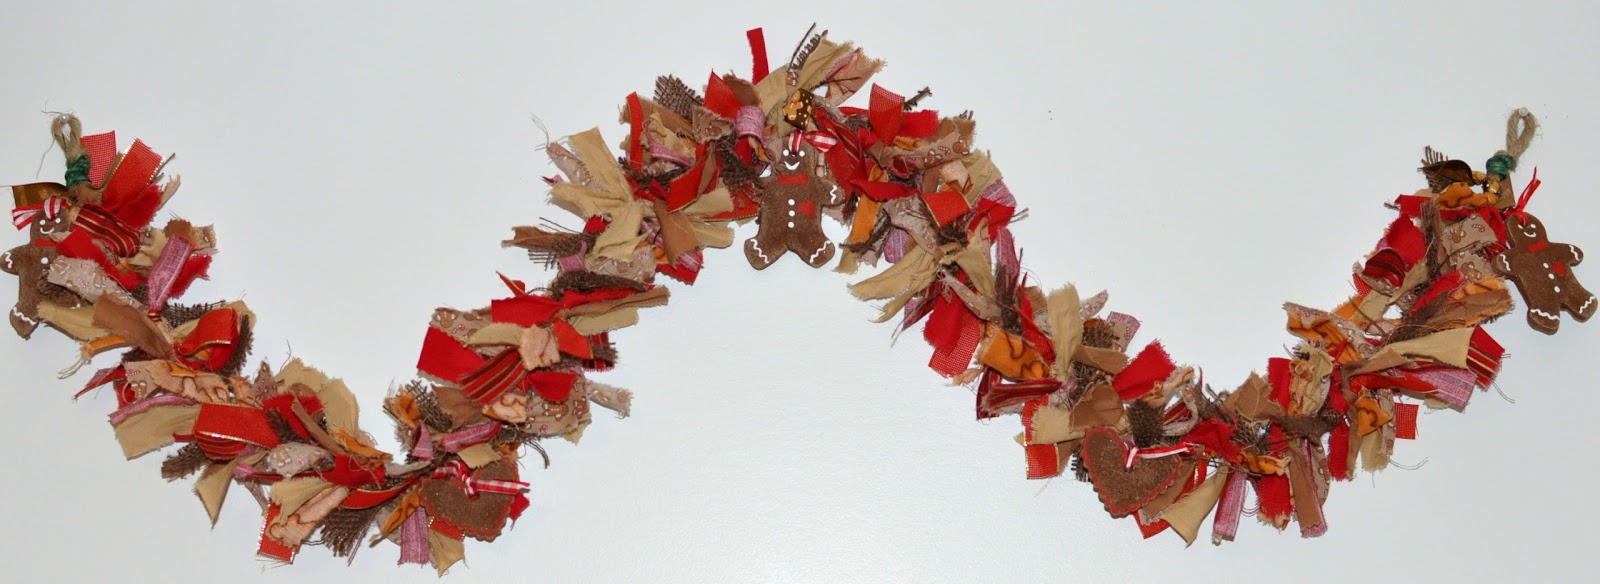
It's never too early to get started for next Christmas.  Practical Scrapper Kerri created this 4 and 1/2 foot gingerbreadman theme garland using material scraps and ribbon she got on clearance from all those after holiday sales.  For details some detail shots  and tips on how to create these you can check out her blog.

2. Weave a Background
Pracitcal Scrapper Patty used up some of her scrap ribbon to create this colorful and texture filled background!  Stop by her blog for more close ups of this project!

3. Fill Negative Space
Practical Scrapper Nicole adhered ribbon behind a circle cut on the Silhouette Cameo and turned it into a beautiful card. This is an easy way to use up your scraps!

4.  Make a Bookmark
Practical Scrapper Deborah used some ribbon, needle and thread, one of her daughter's hair ties and a couple of flowers, to create this stretchy bookmark that she saw on Pinterest.  
 
5.  Create your own patterned paper.
Practical Scrapper Kelly Jean cut strips of ribbon and adhered them onto cardstock to create her own colorful background.  She used a large package of American Crafts ribbon and was able to use 10 rolls of ribbon!  This is a great way to use up some of your ribbon stash!

6. Create a Banner!
Practical Scrapper Kim Ryden used scraps of ribbon to create this fun banner on her card today.  This would also be a great element on a scrapbook page!

Reverse canvas using holiday decor
7. Use it under washi tape to create a solid border
Practical Scrapper Christine created this reverse canvas.  She wanted to keep a border that allowed some wood to show thru but needed to hide the staples on the canvas.  The washi tape alone wouldn't do that but washi tape on top of solid ribbon worked perfectly and made the washi tape less transparent.

8. Add some sunshine!
Practical Scrapper Wendy Coffman used ribbon scraps of various weights to build a halo of sunshine around an embossed yellow cardstock circle, letting the sun shine forth from this sweet, happy card.

9. Weave it through a doily
Practical Scrapper Christine used a piece of ribbon to take a plain white doily to a different level - weaving it thru the spokes.

10. Fray the ends
Practical Scrapper Christine tied a knot but instead of notching or slanting the ends she left them straight and then frayed them, adding a new texture into the layout.


Thursday, October 3, 2013

It's a Hoot!

Good morning!

This is Practical Scrapper Becci here to share with you this sweet owl themed baby shower banner to share with you this morning. I knew that I wanted to go with fall colors - also very "boy" like orange, and blue. I added a primary color of grey, knowing that the nursery will be grey and blue and owl themed.


When I create a custom banner, I think about the theme of the party or room, the colors that might go with it - usually my own choice of what I feel for the person. I round up the papers and think of the general idea then I set to work. I treat each banner panel as though it is it's own creation. For each of the letters of the baby's name, I cut them out of cream card stock and watercolored each one.

For this banner panel I sewed the punched circles (from the next banner panel over) together into a string and attached them - I love a little banner within a banner.


Here I stamped and embossed a little owl in two of the circles, peeking out.


Here I wove strips of the patterned paper together for the background, and also added dots and star sequins.

Here I used a star stamp (from my 6 year old daughter's craft bin), and I embossed it with white Zing powder.

For this last panel, I wanted to use the EXACT owl as the stamp. So I drew it in Illustrator, imported each part of the owl (eyes, belly, nose) into Silhouette and cut each piece. He's so cute.

And as a bonus, I also made an owl taggie blanket to go with this gift:


For this little guy, I made my own patter for him. the face details are all hand sewn.

Thanks for coming over today to check out my owl-licious creations, it was a hoot!

Wednesday, January 25, 2012

Using Ribbon on Layouts

Monday, you got a peek at some fantastic ideas on how to use ribbon on cards. Today, we share with you some fun, fresh, fabulous ideas on how you can use that ribbon stash on your layouts. Ribbon is a great way to accent color and texture to your pages. It may even be the deciding factor for the little bit of character or charm you want to capture in your layout. Take a look at how our designers and readers use their ribbon to create their flare for their pages...


Pin It **Designer projects are not always linked in our posts, but you can always find their blogs in our sidebar or in the staff tab**

Monday, January 23, 2012

Using Ribbon on Cards

This week at Practical Scrappers we are zoning in on ribbon.  It's a topic we visit regularly because we know everyone has it in their stash (and probably more than we can ever possibly use!).  You can find even more ribbon ideas under our Idea Central tab, where we've archived many of our old features on ribbon.  Today we kick things off with cards made by our designers.


Pin It **Designer projects are not always linked in our posts, but you can always find their blogs in our sidebar or in the staff tab**

Sunday, September 26, 2010

This Week's Challenge is Ribbon

I don't know about the rest of you, but I have drawers full of ribbon, boxes of ribbon, bags of ribbon, and jars with pieces of ribbon that I definitely need to use up. So open your drawers, dig in those bags, and pull out those pieces from your jars to show us your creative way of using ribbon.

Thursday, September 23, 2010

Thursday's Ribbon Projects

Erin used scraps of ribbon to make a patchwork collage around her photos. A great way to use up bits and pieces! She also used the Pumpkin Magic digital stamp from our sponsor Robyn's Fetish, printing it onto patterned paper and then trimming it out

Friday, April 23, 2010

1O Things to try with Ribbon, Floss, or Fiber

Looking for some fresh ideas...here's 1O from us here at Practical Scrappers some new and some from previous weeks. You can check out examples by clicking on the links.

1: Create flower petals with floss just like Kerri & Christine. Check out Kerri's example in our Wednesday post or one from Christine's blog here.

2: Use floss to make free flowing swirls, as in Erin's Thursday example.

3: Use ribbon rumpled together to make something like frosting on a cupcake, or grass, or some other fabulous embellishment. See Deanne's Thursday example.

4: Lace thin ribbon or floss thru eyelets to create a shoe, dress, football, etc. See Amy's Wednesday example.

5: Use a variety of scrap ribbon to create a unique background on a card or layout. See Kim's Monday example.

6: Tie ribbon or floss around chipboard letters to jazz them up. See Christine's Tuesday example.

7: Weave floss through eyelets or holes and have the two ends meet in the middle to form a pretty bow. See Caroline's Thursday example.

8: Create leaves for a tree with short ribbon scraps. See Sherri's example.

9: Use ric rac as a unique border for a circular picture. See Joni's example.

1O: Fold ribbon over and use staples to attach to create a unique border. See Christine's example.

Friday, November 6, 2009

Tri-Challenge Winner

Thanks to all who participated this week in our first ever Tri-Challenge with Frosted Designs and Stuck on U Sketches! Some great pages came out of this challenge, but our favorite was Susan's Ensenada Mexico layout. It's so colorful and fun and incorporates all the elements from each of the blogs. Congrats!

Focus: Ribbon

By Erika. Subtle ribbon. Sweet layout.

What can I say about ribbon that these layouts haven’t already said?

You can wrap it around, use it to attach, staple it, glue it, and layer it. Don’t forget you can cinch it, tie it, and make flowers with it! There are a lot of options and a lot of different KINDS of ribbon out there that can add to your page. Our definition of “ribbon” here is pretty broad. I’m pretty sure Samantha used trim on her page, and Sandi used some lace. I love using ric rac, like Kerri, and Jenn found something with fringe!!

Some of our designers got really creative. If you want an idea for what you should do, try one of these ideas:

Sherri used skinny ribbon as leaves on her tree.

Sarah created a watermelon shape with hers. (Love the cinching. Leanne did it too!)

Dianne’s colorful layout employed ribbon to create a background behind her photo.

Erin’s ribbon is a border for her photo.

A few designers used ribbon to draw attention to their title. Joni cut ribbon and backed her letters with it and Kim S positioned her ribbon to help emphasize one word of her title.

You know, when I first started writing these columns, I would go out and search the blogs for ideas on top of what our designers brought to the table. But lately I've realized, we've got plenty of great ideas right here! I hope you agree. Be inspired by these talented women, and enjoy your supplies!!

Thursday, November 5, 2009

Altered Projects - Ribbon

With Christmas quickly on it's way (yes, I said it!), you might be thinking about, or starting, some altered projects for gifts. You're in the right place! Check back weekly, and expect to see lots more of these great ideas over the coming months!


This mini album cover and spine were constructed from recycled cereal boxes. Kerri had a package of hinged 7x7 CM page refills that she bought from her CM consultant. They were on clearance because CM did away with the 7x7 albums and Kerri took the opportunity to make her own cover and spine.


Simplicity - Ribbon

Ribbon is a simple embellishment, and so it's easy to incorporate into a "simple" layout or card. I dare say ribbon seems to be a standard part of many clean & simple pages that I see. Here's how a few of our designers took on the challenge.


Wednesday, November 4, 2009

Our first ever Tri-Challenge


This week we will be conducting a tri-challenge with Frosted Designs and Stuck on U Sketches. The challenge here on Practical Scrappers will be to use at least 3 ribbons on your project.

Here's how can you participate in the tri-challenge:
-Complete one project that includes all three blog's challenges (as seen in Kim's layout above)
-Complete one project for each blog's challenge (as seen on Sarah's blog)

If you do this, become a follower for all three sites, AND enter your project on this Mr. Linky -you will be entered to win a prize on all three sites! Yes, you read correctly, all three of us are giving away a prize. Our prize will be a $10 gift card to JuJu Bees!

I could tell you what the challenges are for Frosted Designs and Stuck on U Sketches...but you know it'll be more fun to go look and find out! So hop over there now and get busy on your projects.

Projects must be submitted by 5:00 ET on Friday, November 6th.

Cricut/Cuttlebug Day with Ribbon

It doesn't take a lot of ribbon, just a snip here and a strip there, to add the bit of detail you need to "finish" your layout or card. Kerri's layout has all the right details and kicks off Wednesday's feature - cards and layouts made with the Cricut or Cuttlebug. Ribbons, texture, and die cuts are the kinds of detail we love and our designers are giving you more ideas for how to include them in your own projects. Use 3 ribbons in your project and add it to our Mr. Linky for this week's challenge.

Then take this inspiration to the Tri-Challenge (in case you haven't heard ;) that we are a part of this week along with Frosted Designs and Stuck on U Sketches. See the details below and use this as an excuse to scrap a few more pages this week!

Cricut/Cuttlebug Ribbon Layouts and Cards